linux上的tomcat8.5通过账号密码登录查看
本文共 176 字,大约阅读时间需要 1 分钟。
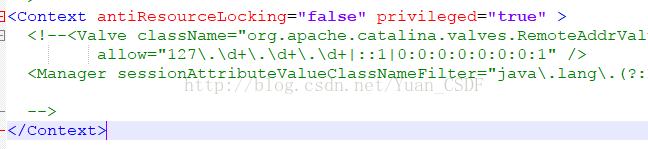
1.在tomcat-users.xml文件加上2.加上这个还不够,要把下面这个注释掉,不然会有
403 Access Denied
把/usr/local/src/apache-tomcat-8.5.23/webapps/manager/META-INF/context.xml里面的
你可能感兴趣的文章
MySQL5.1安装
查看>>
mysql5.5和5.6版本间的坑
查看>>
mysql5.5最简安装教程
查看>>
mysql5.6 TIME,DATETIME,TIMESTAMP
查看>>
mysql5.6.21重置数据库的root密码
查看>>
Mysql5.6主从复制-基于binlog
查看>>
MySQL5.6忘记root密码(win平台)
查看>>
MySQL5.6的Linux安装shell脚本之二进制安装(一)
查看>>
MySQL5.6的zip包安装教程
查看>>
mysql5.7 for windows_MySQL 5.7 for Windows 解压缩版配置安装
查看>>
Webpack 基本环境搭建
查看>>
mysql5.7 安装版 表不能输入汉字解决方案
查看>>
MySQL5.7.18主从复制搭建(一主一从)
查看>>
MySQL5.7.19-win64安装启动
查看>>
mysql5.7.19安装图解_mysql5.7.19 winx64解压缩版安装配置教程
查看>>
MySQL5.7.37windows解压版的安装使用
查看>>
mysql5.7免费下载地址
查看>>
mysql5.7命令总结
查看>>
mysql5.7安装
查看>>
mysql5.7性能调优my.ini
查看>>